My GIF making workflow with Final Cut and Gifski
File this in “blog it before I forget it.”
Recently I was making a GIF for Lauren based on an idea she had related to Multi-region WordPress Hosting. I have a bunch of different tools that I use when working with GIFs, and I sort of think of them in three categories:
- Taking a pre-existing video and making it into a GIF
- Making tweaks to a pre-existing GIF
- Video editing tools
If I had to break it all down the way I GIFs can be summed up into: Turn something in to a video, then turn that video in to a GIF. Its just the tools I use to accomplish that differ depending on the time I have and the complexity of what I’m trying to do.
Taking a pre-existing video and making it into a GIF
This one is relatively straightforward. There are a lot of tools that do this, but in my opinion by far the best one in terms of quickly getting good quality at small file sizes is Gifski. It was originally a command line tool, but also has a very simple and slick GUI version for macOS. Looking at the website now, it looks like it has a GUI for Windows as well that I haven’t used yet. I’m typically using the macOS GUI, and it lets you drag a video file in, trim it and resize it, and adjust quality settings.

A screenshot of a GIF of a GIF in the making
The great thing about a tool this simple is it makes it easy to make things quickly by feeding it all sorts of video. Clips from YouTube, screen recordings I make, etc. There are tons of possibilities!
Making tweaks to a pre-existing GIF
This is sort of a weird between-y workflow. I could do this stuff using the tools in category 3, but sometimes that’s more complicated or time consuming than I want. If I have a GIF, (or maybe a GIF I just made from a video using Gifski), but I just want to crop the GIF, change the frame rate, or add simple text or images to the GIF, I like to use GIF Brewery.
Unfortunately, this tool hasn’t been updated in a while and I think it’s been pulled from the Mac App Store. That being said, it still works for me and has a place in my toolbox. I think in the long-term, the stuff I do in GIF Brewery will be replaced by the tools I’m putting in my third category.
Video editing tools
When the first two categories of tools above fail me, I turn to Final Cut Pro.1 This is a workflow I’m just recently getting comfortable with, but I’ve learned that with Final Cut’s masking tools, animation features using key frames, and a whole bunch of other stuff I’m still learning about, I can do quite a bit of cool things. The problem with this is what I’m left with is a video file, not a GIF! Final Cut does have GIF export, but the size of files it produces are massive, and the quality is usually not that great either, so I use a different approach. Originally, I would export a mov or mp4 file, then use the macOS GUI for Gifski to make a nice small and high quality GIF.
That being said, I found two problems with that approach, which is ultimately why I’m writing this surprisingly long blog post. Basically, problem #1 is this result doesn’t let me make GIFs with transparent backgrounds, and problem #2 is I can’t make GIFs at non-standard resolutions. Final Cut typically wants to export video at typical 16x9 aspect ratios with resolutions like 1920x1080. Here’s my new workflow to fix both of these issues:
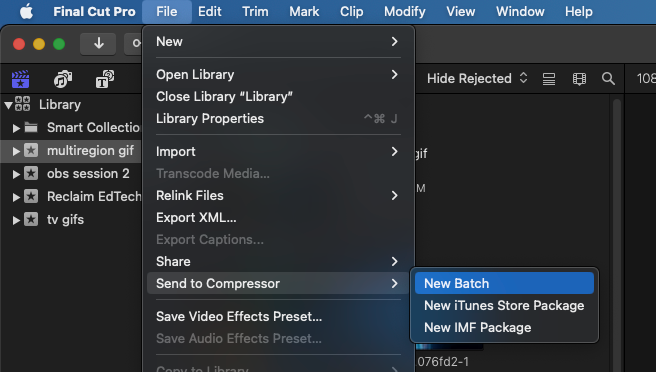
Step 1: Create the GIF using Final Cut Pro and send it to Compressor
The first step is to make the GIF using Final Cut Pro’s tools! Instead of exporting the video straight out of Final Cut, I use Compressor, which is Apple’s advanced video 2 compression and export tool. I can do this by going to File –> Send to Compressor –> New Batch
Step 2: Crop and Export from Compressor as an image sequence
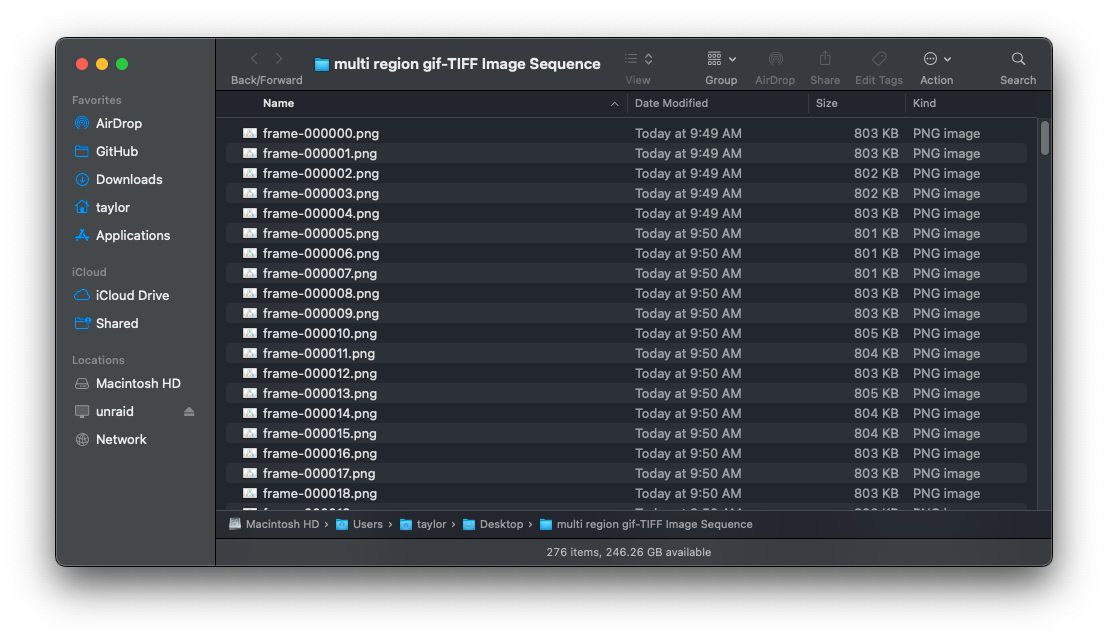
In compressor I drag the TIFF Image Sequence preset on to the project, then select my export location, crop the image, and set the output to PNG, as TIFF is more quality than I need. Once I’ve done that, I start the export with the Start Batch button.
A GIF of a GIF of a GIF in the making
This allows me to crop the image to whatever size I want. Secondly, instead of outputting a video file, it outputs a series of images, which will preserve transparency if my GIF has it. After the export is done, I’m left with a series of images in a folder, but not a GIF. That part comes next!
Step 3: Use the Gifski CLI to combine the images into a GIF!
Now I can use Gifski to assemble a gif out of those images! Unfortunately the macOS GUI version of Gifski doesn’t support this, but the command line version does. I used homebrew to install the Gifski CLI:
brew install gifski
Then I cd into the folder where my images have been exported and run this command to assemble them into a GIF!
gifski --fps 30 --width 480 -o out.gif *.png
A couple notes on the above command:
--fps 30sets the FPS of the GIF. 30 is actually quite high for a typical gif, most of the ones you see are 15 or lower, but in this case I wanted smoooooth motion.--width 480will resize the GIF proportionally. You can leave this option off if resizing is not needed.-o out.giftells Gifski to name the fileout.gif*.pngwill tell Gifski to look at every .png file in the folder when making the GIF
Here’s the end result, and its less than a megabyte!3

Final Cut Pro and Compressor are expensive, but they are thankfully NOT subscriptions (I really don’t want to use Adobe stuff). I bought my copy through the Pro Apps Bundle for Education nearly 6 years ago and it’s still being updated and I’m still using it. That bundle is definitely the way to go if you are an educator. ↩︎
and audio, and apparently still images too! ↩︎
Final Cut DOES have a native GIF export, but the file sizes are huge for similar quality. I couldn’t get it under 5 Mb, which is way too big. ↩︎
Comments